Portal 2 - Hexing Models
Warning! Just use if it is not a prop_static casting shadows. This is a uncommon way to hex models (because some files you would usually copy as well will be missing here), but it works.
The Model File
To get the model you want to hex, extract only it's .mdl file from Steam\steamapps\common\portal 2\portal2\pak01_dir.vpk using GCF Scape.
Put this .mdl file into another directory than the original, for example Steam\steamapps\common\portal 2\portal2\models\myhexedmodels. If you don't do this, the original model will override your hexed model.
Do not rename your file. Internally it still uses the original's physical model. Renaming it will break that link.
Applying New Texture
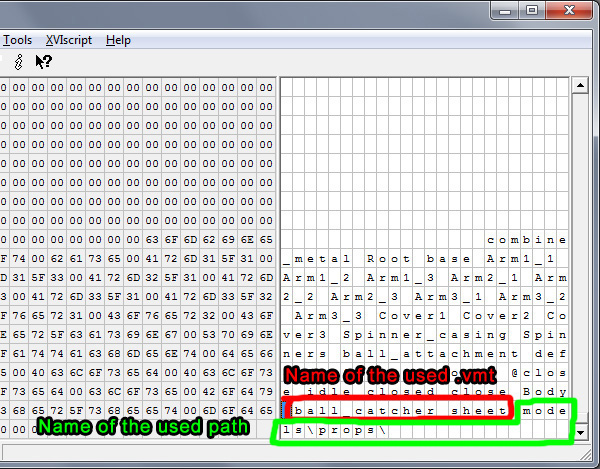
To apply a new texture, you need a hex-editor (i.e. XVI32).
Open your .mdl file with the hex-editor. Now look into the right part of it and scroll to the end of the file.
The last entries in a .mdl file are responsible for it's textures. The first one is the name of the texture .vmt file itself (without the ending), for example ball_catcher_sheet. There may be more than one if the model has more than one skin.
The second entry is the path relative to your game's main directory, for example models\props\ (using combine_ball_catcher.mdl here). Also there may be more than one, if the model uses textures from different locations.
Now change the texture name or the texture path, or both if you wish. The count of characters of the texture's name and path must be exactly the same!
Save your .mdl. Now it uses the texture .vmt file from the path you entered.
I recommend to check the model in the SDK Modelviewer and, if it crashes or shows errors, check what you've done.